You are here: Commerce Manager > System Administration > System Settings > Adding a 1 to Many Relation

Adding a 1 to Many Relation

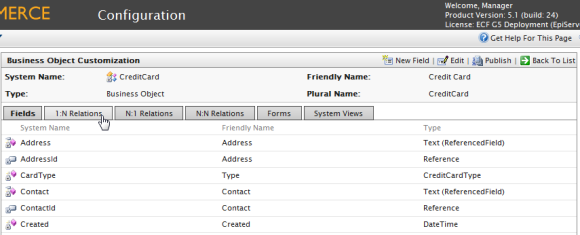
Business Foundation objects allows you to specify 1 to Many Relationships. For example, if you have one organization, you can relate many types of data to that organization, such as multiple contacts, addresses, or organizational units or divisions within an organization. Within a 1:N relationship, the business object you selected will be "1."

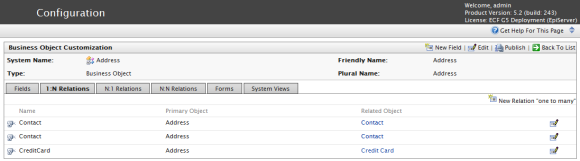
In the example below, 1 = Organization and N = related objects such as Address, Contact, CreditCard, etc.

To add a 1 to many relationship to a business object, you will need to create a new business object or use an existing one. On the Business Object Customization page, click on 1:N Relations.

Click on New Relation "one to many" to create a new relation.

Under General Info, the Primary Object Organization is automatically set to Organization.

  1. Select a Related Object to relate an the Organization object in the dropdown.
  2. The Object section below General Info will have a different title based on Related Object you selected. For example, if you selected "Address," the title would be "Object 'Address'".
  3. Enter in a Field Name and Friendly Name. They are autopopulated already using the system name of the business object.
    Both names must be unique and not be the same as an existing field. The Field Name cannot contact spaces or special characters, only letters, numbers, and underscores.
  4. Checkmark the box Allow Nulls if you do not want this to be a required field the user fill in while editing a form. Otherwise, uncheck the box to make it a required field.
  5. Under Add Field To, checkmark the Forms you want the field to render in, such as the Edit Form (to enter and submit information) or View Form (read information only).
  6. Under the Object "Name of Primary Object" section, select a Display region in the dropdown box. Additional options such as Display Text and Display Order will appear based on your dropdown menu selection.
  7. Once all the relevant information is entered, click on Save.

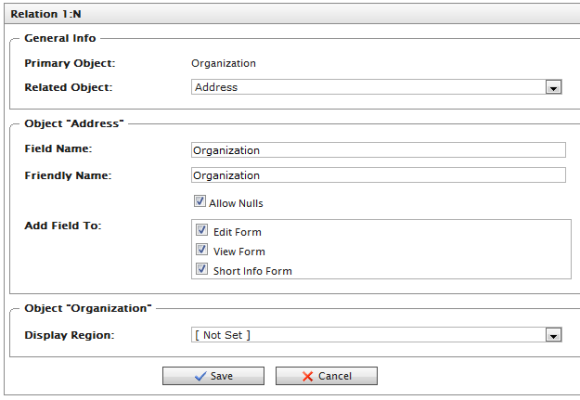
The Related Object will have the Primary Object appear under the opposite relationship (N:1) on its configuration form. For instance, if organization is the Primary Object and the Related Object is Address, the relationship is automatically generated under the N:1 tab in Address.


Version: EPiServer Commerce 1 R2 SP2| Last updated: 2012-09-20 | Copyright © EPiServer AB | Send feedback to us